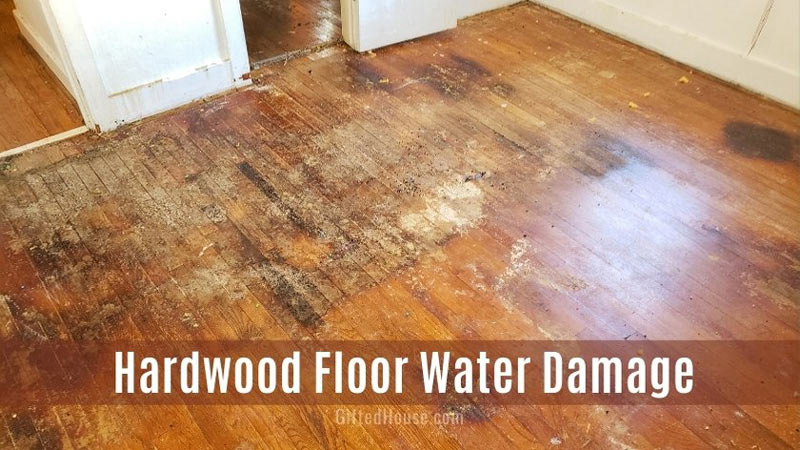
Like the Joker to Batman, water is the enemy of your hardwood floor. If water is left to soak into the wood it can rot, smell, swell, discolor and distort the wood, whilst leaving mold underneath or in between the planks.
The best way to avoid water damage is to clean up any spills straight away, making sure to completely dry the floor. If your floor is water damaged, there are ways to improve its look yourself, or more successfully by hiring a professional company.
What Does Water Damage on Hardwood Floors Look Like?
Water damage can affect your floor in many ways. Here are things to look out for:
- The swelling or cupping of individual planks (bumps or humps in the wood)
- Planks lifting up off the floor (no longer safe to walk on)
- Dark coloration or staining (usually black or dark brown, along the outskirts of the plank)
- Visible water or ‘squelching’.
- Mold
How Do I Prevent Water Damage?
The primary way to prevent water damage is to reduce your hardwood floors’ exposure to water. Regularly cleaning your hardwood floors would not only keep it clean but also increases the life of the wood floor.
- Made sure all wet or muddy shoes are kept off the wooden floor. Use shelves or a mat to stop the dampness from soaking into the wood.
- Clean up all water or other liquid spills immediately.
- Dry around your kitchen or bathroom sink to ensure there is no drip.
- Fix any leaks or holes in your roof as soon as possible.
How Long Does It Take for Water to Damage a Hardwood Floor?
As a general rule of thumb, the longer the floor’s exposure to the water, the worse the damage will be. If water has been left on the wooden floor for more than 24 hours, the damage will likely be quite significant.
How Do I Dry My Hardwood Floor After a Leak?
Even if you have cleaned up the surface water, the wood could have likely already soaked up the liquid. Take a look at these steps to ensuring your hardwood floor is completely dry:
- Remove any wet objects from the room.
- Mop the floor removing as much excess water as possible, ensuring the floor is disinfected.
- Dry the area with a towel or cloth.
- Inspect the wood for mold. If there are signs of decay, this needs to be sorted. Mold is harmful to your health. Check out this article from Family Handyman for the best way to remove mold from your Hardwood floor.
- Expose the wood to air. Open windows and doors to let out moisture, stopping it from getting trapped in the wood.
- Use a dehumidifier if it is safe to do so. Place the dehumidifier in the center of the room for 24 hours.
- Test the floor with a Moisture testing meter; this will help you see the point you are at in removing the water. If the meter is still showing signs of moisture, it may be time to seek professional help.
Can Water Damaged Wood Floors Be Refinished?
A water-damaged floor can be refinished. However, if the water damage is severe, and it is likely the wood is still damp underneath, you can only refinish the floor after the affected plans have been removed and its foundation restored.
Can I Fix Water Damaged Hardwood Floor If It Is Swollen?
If the hardwood floor is only buckling slightly, it may be possible to fix the damaged hardwood by nailing into the floor again. This is only if there is no moisture underneath.
However, if the hardwood floor is very swollen, you need to replace the wood planks. The steps are very similar to those listed below. However, for a tutorial specifically for water damage leading to swelling, check out this tutorial.
How Do I Restore Water Damaged Hardwood Floor?
It is recommended to employ a professional to replace your hardwood floor planks, as the job is laborious and can be a tricky task.
However, if you are a skilled craftsperson, take a look at the steps below.
- Ensure the water leak has been resolved. This prevents any further damage to your flooring.
- Identify the planks that need to be removed. These planks will show signs of water damage (see above) and look different from your other dry wood planks.
- Use a plunge saw to remove the damaged planks, leaving the subflooring intact.
- Check to see if the subflooring has been damaged by the water. If it has, you must also remove this, ensuring the concrete underneath is dry. If the subflooring shows no moisture, you can keep this intact. (Ensure you understand how to use a Moisture testing meter properly).
- It’s now time to replace your plank. This means cutting your new plank down to size and installing it with wood glue. Check out this video for an easy step-by-step tutorial.
- https://www.youtube.com/watch?v=YIBuAxJpyfU
- After you have replaced the plank, you need to sand and refinish the whole floor. This ensures unity between your new and old planks. Take a look at the video below for guidance.

